August 2018

Two POWERFUL Photoshop Cut Out Techniques – Difficult Selections Made FAST and EASY

In this Photoshop tutorial, you will learn how to cut out trees in Photoshop.

You will learn two powerful techniques that you can use to cut anything! Not just trees!

📘 INDEX – How To Cut Out an Image in Photoshop

00:42 – Using Blend If to Cut Out an Image in Photoshop
05:03 – Using Channels to Cut Out an Image in Photoshop

LINKS
Advanced Hair Masking Tutorial

PTC Newsletter:
► http://ptcvids.com/subscribe

Premium Tutorials:
► http://ptcvids.com/shop

Website:
► photoshoptrainingchannel.com

FOLLOW ME

Instagram:
► http://instagram.com/jrfromptc

Facebook Group:
► http://ptcvids.com/group

Twitter:
► https://twitter.com/JRfromPTC

LinkedIn:
► https://linkedin.com/in/jesusramirez9

CREDITS
● Stock Images provided by stock.adobe.com
● Photoshop video tutorials by Jesus Ramirez

#PhotoshopTutorial #Photoshop #PTCvids

How to Make a Paper Cutout in Adobe Photoshop | Adobe Creative Cloud

Add a hand-crafted, layered look to your design.

Start from scratch, or download practice files [https://adobe.ly/2PGRTYn] for a head start. Steps below.

Prep your project:

1. Open paper-cut_start.psb.
2. Open the Layers panel (Window – Layers) and expand the fish layer group.

Add depth with drop shadows:

1. Add a drop shadow: Click the front fin layer, then click the fx icon at the bottom of the Layers panel. Choose Drop Shadow and set the shadow properties. Click OK.

Tip: We set the Angle to 133, enabled Use Global Light, and set the Distance to 35.

2. Copy drop shadow: Use Opt (Alt) + drag to copy the drop shadow properties to the body and wave 1 layers.
3. Double-click the drop shadow on the wave 1 layer and modify the properties. Click OK.

Tip: We set the Opacity to 60, Distance to 40, Spread to 15, and Size to 90.

4. Use Opt (Alt) + drag to copy the drop shadow from wave 1 to wave 2 and wave 3.

Add a paper texture:

1. Select the fish layer group. Click the Create new fill or adjustment layer icon at the bottom of the Layers panel. Choose Solid Color and choose a medium gray from the Color Picker. Click OK.
2. Choose Filter – Noise – Add Noise. Click Convert to Smart Object. Set the Amount to 20 and check Monochromatic. Click OK.
3. Choose Soft Light from the Blend Modes drop down at the top of the Layer panel.

That’s it!

To learn, more visit our Photoshop Tutorials page.

Photoshop: https://helpx.adobe.com/photoshop/tutorials.html

Subscribe: https://www.youtube.com/user/adobecreativecloud?sub_confirmation=1

LET’S CONNECT
Facebook: http://facebook.com/adobecreativecloud
Twitter: http://twitter.com/creativecloud
Instagram: http://www.instagram.com/adobecreativecloud/

Adobe Creative Cloud gives you the world’s best creative apps so you can turn your brightest ideas into your greatest work across your desktop and mobile devices.

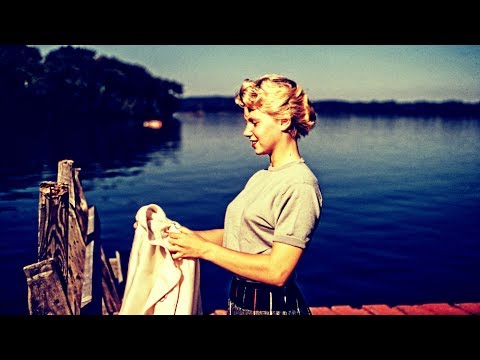
Gimp 2.10.6 Tutorial – Vintage-Retro-Effekt

In diesem Tutorial zeige ich eine weitere Möglichkeit, einen weiteren Workflow, wie man mit Gimp, in diesem Falle Gimp 2.10.6, einen Vintage-Retro-Effekt erzeugen kann. Viel Freude dabei.
Photo by Les Anderson on Unsplash
https://unsplash.com/photos/ixb3sh0thWI

Gimp Links
Gimp herunterladen
https://www.gimp.org/
Auch bei Partha
https://www.partha.com/
Darktable herunterladen
https://www.darktable.org/
RawTherapee herunterladen
http://rawtherapee.com/
LightZone herunterladen
http://lightzoneproject.org/
Auch hier
http://www.computerbild.de/download/LightZone-9294539.html
Google Nik-Collection herunterladen
https://www.google.com/nikcollection/
Wer meine Arbeit unterstützen möchte, der kann das hier tun
https://www.patreon.com/mygimptutorialchannel
Gimp-Registry
http://registry.gimp.org/glossary/a
FX-Foundry
http://gimpfx-foundry.sourceforge.net/
Dokumentationen : Die FX-Foundry 117 auf einen Streich
http://www.gimp-atelier.org/forum/viewtopic.php?p=5709#p5709
Gimp Scripte
http://gimpscripts.com/
Gimphelp
http://gimphelp.org/
Werde Patron: https://www.patreon.com/mygimptutorialchannel
Ich würde mich freuen, wenn ihr auf meinen Tutorials euren Adblocker ausschalten könntet.
Das würde mir sehr helfen.
gimp tutorial deutsch, gimp 2.8 tutorial deutsch, gimp hintergrund transparent machen,
gimp logo erstellen, gimp thumbnail erstellen, gimp bild in bild einfügen, gimp freistellen,
gimp banner erstellen, gimp schrifteffekte, gimp, gimp ausschneiden, gimp hintergrund ändern,
gimp ausschneiden und einfügen, gimp ausschneiden ohne hintergrund,gimp augen strahlen,
gimp animation tutorial deutsch, gimp augenfarbe ändern, gimp anleitung, gimp alphakanal,
gimp anfänger tutorial deutsch, gimp als jpg speichern, hintergrund mit gimp ändern,
gimp farbe ändern, gimp größe ändern, gimp hintergrundfarbe ändern, gimp pinselgröße ändern
Ich würde mich freuen, wenn ihr auf meinen Tutorials euren Adblocker ausschalten könntet.
Das würde mir sehr helfen.